Take Your Lawn to a Different Level: DIY Baseball Field Stripes
- By Alexander Williams
You've watched countless baseball games and often marvel at the patterns on the field, but you never thought you could do it in your own yard. You can. And it's easy, actually.
With a plan and the right equipment, your lawn can look like Yankee Stadium—and you'll have people from blocks away in awe of your finely groomed property.
How Do They Do It?
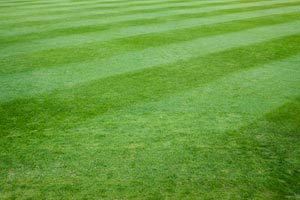
Although elaborate designs on the baseball field take practice and artistry, stripes and crisscrosses are doable on your first try. To begin, you must understand the basic concept of optics (the science of light) and reflection (and a little geometry, but don't freak out).
Generally, in a person's line of sight, light passes along the same path. When light interacts with matter (in our case, grass), we get reflection. So, for every row of grass, you're cutting in opposite directions, because you're looking for a light/dark pattern.
Bending Blades
When the blades are bent towards you, light reflects off only the tips of grass so it looks darker; when blade direction is away from you, light reflects off the entire blade of bending grass. Cutting your lawn in opposing directions will create pattern. By bending the blades of grass in different directions, you will get baseball stripes.
If the grass is longer, you can enhance contrast by bending the blades as far down as they will go. This gives the light more of a surface to reflect off of.
Mower/Accessories
The type of mower isn't necessarily the issue when attempting grass patterns. It's more about the striper (also called a roller). Baseball field groundskeepers often use old-fashioned reel mowers because a striper is already attached the bottom. Most modern mowers only have a flap to guard from rocks. You can find roller attachments and lawn mowers online that will help with patterning.
Patterns
Before getting started, clear debris out of your yard. Draw a pattern on a piece of paper so you can visualize the direction of your stripes. Throughout the day, the sun will highlight different parts of your lawn; factor this into your design. If you are concerned about creating straight lines, pick objects in your yard to aim for like a bush or crack in the sidewalk. The first stripe matters most.
- Stripes: Always start by mowing a clean perimeter to help with turns. Choose the direction you'd like your pattern to face and once you've mowed a few passes back and forth, hit the perimeter to polish edges and clear any irregularities.
- Checkerboard: Begin by following the direction of a striped design—mow the perimeter, then take a few passes back and forth to create rows. Take care when moving the lawnmower to create the stripes in the opposite direction for the checkerboard pattern. You don't want turf damage after all your hard work. So, first stripes going north/south then stripes going east/west, or vice versa.
- Diagonal checkered stripe: Same as the checkerboard just move in diagonal directions.
If there is an obstacle in the way, such as a tree, mow around the object. You will cover the uneven portion on your next pass as you come in the opposite direction.
Once you've perfected the art of the stripe, try mowing your initials in the lawn. Neighbors will be tongue-tied.
New! Comments
Have your say about what you just read! Leave me a comment in the box below.Like The Best Baseball Blog
+1 The Best Baseball Blog
Hot Stores! |


